Tickets
Ticket page
The ticket page allows posting replies to customer, move a ticket between statuses, change category/priority, attach files, assigning a ticket to agents etc.
Ticket Buttons
Buttons on the top of the page are used to change the status of the ticket. Note: the buttons displayed are permission dependent and ticket-status dependent.
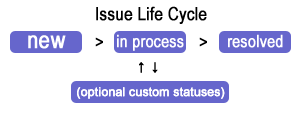
- Take over - take over the ticket. Status will change to 'In process' and you will become the 'assigned to' agent.
- Close - close the ticket. The ticket status will change to 'Resolved'.
- Re-open - restore a 'resolved' ticket back to 'in-process'.
Advanced "more" menu:
- Edit - change ticket's subject and body.
- Delete - pressing this button deletes the ticket (moved to "bin" then deleted permanently after 15 days)
- Mark as Spam - delete the ticket and disables the submitter user so they cannot create any more tickets.
- Forward - send an email about this ticket.
- Share - share a ticket via a link (anyone with the link will be able to view the ticket, until you "unshare" it)
- Request approval - request approval/sign-off on a ticket from a chosen supervisor
- Print - print the ticket.
- Clone - duplicate the ticket.
- Close as duplicate - closes the ticket and links it to another duplicate ticket.
- Close silently - close a ticket without sending a "Ticket closed" email notification to the user (shown only if you have the "ticket closed" email notification enabled)
- Merge - "merges" a ticket with another ticket.
- Link - "links" this ticket to another "related" ticket.
- Add subticket - adds a subticket to the ticket (you can select an existing ticket from the list popup, that shows other tickets from the same user/company, or provide a ticket ID explicitly, or create a completely new ticket). Please note that you can't make one ticket a subticket of two different tickets.
- Add parent ticket - make another ticket - "parent" of the current ticket
- Convert to a reply in another ticket - converts a ticket into a reply in another ticket
- Publish to KB - create a KB-article from this ticket (you can optionally create a KB-article visible to "agents" only).
- Subscribe - Add yourself to ticket "subscribers" so that you receive all future updates to this the ticket
- Hide/show system log entries - allow you to hide/unhide system entries from the ticket log, leaving only human replies in it
Ticket Details
This area on the right shows various ticket properties:
- Status ("new", "in-process" or "resolved").
- From - ticket originator - the user the ticket comes from. Clicking the username will show the user's information in a small popup, including their email, first/last name, past ticket history, etc. To proceed to the user's profile page, just click the username inside the popup again.
- Ticket category & priority.
- Ticket date - date & time when a ticket was created.
- Assigned to - technician who handles the ticket.
- Hours spent - time spent handling the ticket (editable for technicians and administrators).
- Start date - date & time when the ticket was "taken" by a technician (or was assigned to one).
- Close date - date & time when the ticket was closed.
- Due date - you can optionally add a "due date" to the ticket
- Time spent - allows you to set hours/minutes/seconds spent working on this ticket. This field has an automatic timer that starts counting every time you open a ticket. The timer stops if you close the ticket or switch to another window. The automatic timer can be disabled in the settings.
- Recurrence settings - if the ticket is "scheduled" to repeat, you can see the schedule and click the button to edit the schedule
- etc.
Message Log
Contains the conversation between the ticket submitter and the help desk team (so-called "comments") along with all system events and status changes for the ticket. Functions like a discussion forum.
When someone posts a message into the log, the message is emailed to the ticket followers aka "subscribers". By default, ticket followers are: the ticket submitter, and the "assigned-to" person. A technician or an administrator can add one or more followers to a ticket. Also, any user who posts a message can address particular recipients, rather than all followers.
A technician can also mention other technicians using the @-symbol when writing a reply. This will add the mentioned user to ticket subscribers so they will receive email notifications.
When typing a response to a ticket, you can use Ctrl+, (control + comma) to bring up the "Canned responses" dropdown, or Ctrl+. (control + dot) for the "Knowledge Base" dropdown - to insert a canned response or a KB article respectively.
"Suggested articles" in tickets
The helpdesk app also generates a list of "suggested articles from the Knowledge base" for every incoming ticket. When you're first looking at a "new" unassigned ticket that has no replies yet, there will be a "reply" from "Jitbit AI bot" showing you the suggested articles. The SaaS version uses vector embeddings to index your KB and generate these. The self-hosted is limited to finding knowledge base "tags" in the ticket text.
After the ticket has been answered, you can still access those "suggested articles" by clicking the "insert KB article - Suggested articles" in the reply box.
Using AI to write responses
If you enable ChatGTP-integration in integrations you can leverage GPT to help you generate responses by using your Knowledge Base for context. More info here
Ticket Life-Cycle